How to Enable GPU Acceleration in Adobe Premiere Pro CS 5 for Unsupported nVidia GeForce Cards
Published:
Well, if you own a card from AMD then you really are out of luck, but it turns out that with a little bit of tweaking under the hood Premiere Pro CS5 will work with other NVidia CUDA-enabled cards that arent explicitly listed. The process to do so is quite simple. The first thing you need to do is locate an executable called GPUSniffer.exe. This file is usually located in the Adobe Premiere Pro CS 5 folder, depending on the specific version of the software you have. In addition to this it could be under different paths depending on the version of Windows. The easiest way to determine the correct folder is by right-clicking on the application shortcut you would usually use to launch the application and check the folder path under its properties. Use Windows explorer to check that GPUSniffer.exe is indeed present in that folder.
GPUSniffer is an application that some adobe products uses to identify your GPU and thus enable the correct supported features for that card. Youll need the output from GPUSniffer to extract the identification string Adobe uses for your card. Although you can run GPUSniffer directly from Windows explorer, the program closes as soon as it has finished running, so theres no chance to see the output in time. Therefore you will have to run the program from the Command Prompt.
If youve never opened the command prompt, its pretty easy. In older versions of Windows all you need to do is open the Start Menu, click on the Run option and then type CMD into the window that appears. Hit enter and the command prompt will appear. Change to the directory that contains GPUSniffer by typing CD c:\program files\Adobe\ Adobe Premiere Pro CS 5 or whichever directory you previously confirmed the executable to be in. Once youve done that run the program by typing GPUSniffer and hitting enter. The program will now run and you will be able to see the type of graphics card it has identified. For example it may say name: Geforce GTX 460. Write down that exact name, including spaces and capitalisation. Its what we need to go on to the next step.
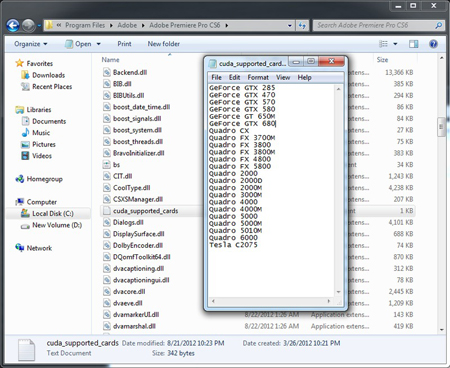
In the same folder as GPUSniffer, youll find a text file named cuda_supported_cards.txt. Open this with Notepad or another text editor. You may need to run it in Administrator mode in order to edit the file. Youll see a list of supported cards in the file already, just add yours exactly as it was listed by GPUSniffer on the first available line and save the file.
Before you start Premier, run the Nvidia Control Panel and under Manage 3D Settings choose Premier CS4, this will still work. Under Specify the settings for this program, go to Multi-display/mixed-GPU acceleration and choose Compatibility performance mode. Remember to apply your settings. When you now run CS5 and go to the settings for the Mercury Playback Engine, you should see CUDA acceleration in addition to software rendering as an option.
Remember to test the feature to ensure that it is stable and works correctly, since this isnt yet officially supported by Nvidia or Adobe there are no guarantees.